
How to Setup AWS App Mesh: A Comprehensive Guide
In today’s microservices-driven world, managing service-to-service communication can become incredibly complex. AWS App Mesh simplifies this complexity by providing a service mesh that makes it easy to monitor and control microservices running on AWS. This comprehensive guide will walk you through the process of how to setup AWS App Mesh, covering everything from initial configuration to advanced features. We’ll delve into the core concepts, required prerequisites, and step-by-step instructions, ensuring you have a clear understanding of how to leverage App Mesh for your applications.
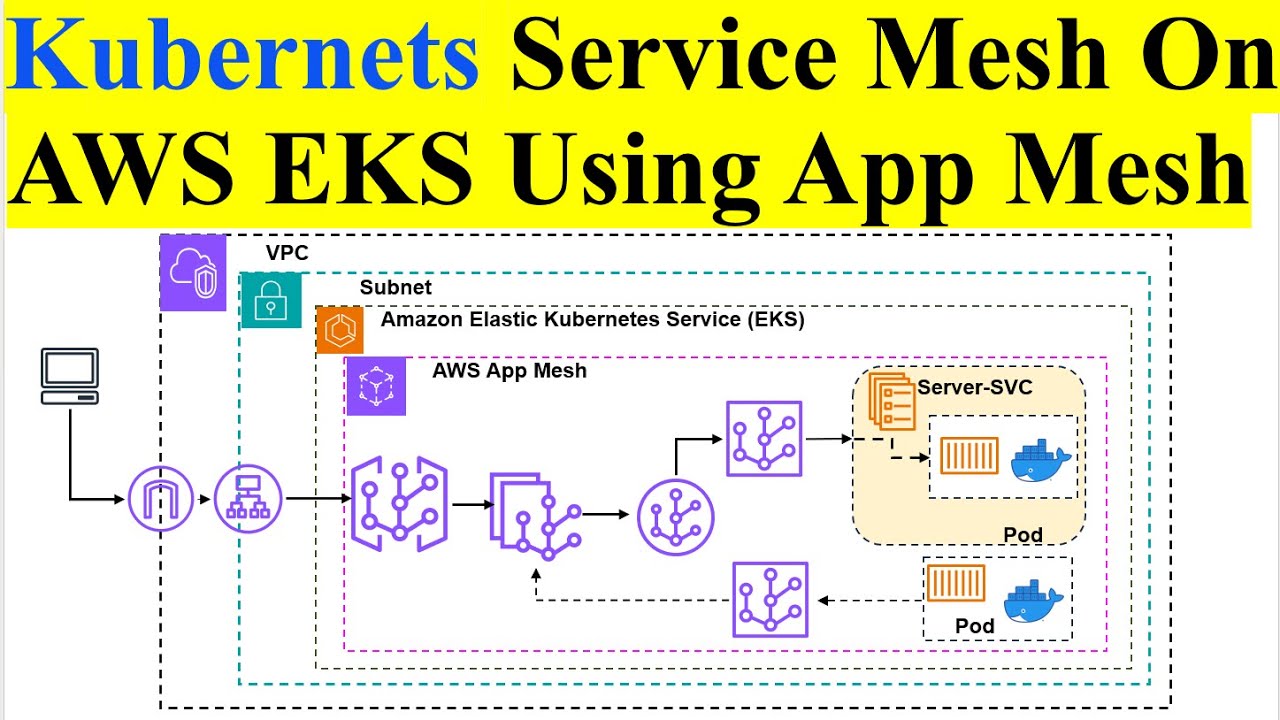
Understanding AWS App Mesh
AWS App Mesh is a service mesh that provides application-level networking. It allows you to easily monitor and control communications across your microservices. By configuring App Mesh, you can gain insights into your application traffic, implement traffic management strategies such as canary deployments and A/B testing, and secure your service-to-service communication.
Key Benefits of Using AWS App Mesh
- Traffic Management: Route traffic based on weights, headers, or paths.
- Observability: Gain detailed insights into your microservices with metrics, logs, and traces.
- Security: Secure service-to-service communication with TLS.
- Fault Injection: Test the resilience of your applications by injecting faults into the traffic flow.
- Integration: Seamlessly integrates with other AWS services like ECS, EKS, and EC2.
Prerequisites for Setting Up AWS App Mesh
Before you begin setting up AWS App Mesh, ensure you have the following prerequisites in place:
- AWS Account: You’ll need an active AWS account with appropriate permissions.
- AWS CLI: Install and configure the AWS Command Line Interface (CLI).
- kubectl: If you are using Kubernetes, install and configure kubectl to interact with your cluster.
- Container Orchestration Platform: Choose your container orchestration platform (e.g., ECS, EKS, EC2).
- Envoy Proxy: App Mesh uses Envoy as the proxy, so ensure it’s compatible with your chosen platform.
Step-by-Step Guide: How to Setup AWS App Mesh
Follow these steps to configure AWS App Mesh for your microservices:
Step 1: Create an App Mesh
The first step is to create an App Mesh using the AWS CLI or the AWS Management Console. This mesh will serve as the logical boundary for your microservices.
Using AWS CLI:
aws appmesh create-mesh --mesh-name my-app-meshUsing AWS Management Console:
- Navigate to the AWS App Mesh service in the AWS Management Console.
- Click on “Create mesh”.
- Enter a name for your mesh (e.g.,
my-app-mesh). - Click on “Create”.
Step 2: Define Virtual Services
Virtual services represent the logical endpoints that your applications communicate with. Define virtual services for each of your microservices.
Example:
aws appmesh create-virtual-service --mesh-name my-app-mesh --virtual-service-name service-a.example.com --spec '{"provider": {"virtualRouter": {"virtualRouterName": "router-a"}}}'This command creates a virtual service named service-a.example.com that uses a virtual router named router-a.
Step 3: Create Virtual Routers
Virtual routers handle the traffic routing for your virtual services. Create virtual routers for each virtual service.
Example:
aws appmesh create-virtual-router --mesh-name my-app-mesh --virtual-router-name router-a --spec '{"listeners": [{"portMapping": {"port": 8080, "protocol": "http"}}]}'This command creates a virtual router named router-a that listens on port 8080 for HTTP traffic.
Step 4: Define Route Rules
Route rules determine how traffic is routed to different virtual nodes. Define route rules for each virtual router.
Example:
aws appmesh create-route --mesh-name my-app-mesh --virtual-router-name router-a --route-name route-a --spec '{"httpRoute": {"match": {"prefix": "/"}, "action": {"weightedTargets": [{"virtualNode": "node-a", "weight": 100}]}}}'This command creates a route named route-a that routes all traffic (prefix: "/") to a virtual node named node-a with a weight of 100%.
Step 5: Create Virtual Nodes
Virtual nodes represent the actual instances of your microservices. Create virtual nodes for each instance.
Example:
aws appmesh create-virtual-node --mesh-name my-app-mesh --virtual-node-name node-a --spec '{"backends": [{"virtualService": {"virtualServiceName": "service-a.example.com"}}], "listeners": [{"portMapping": {"port": 8080, "protocol": "http"}}], "serviceDiscovery": {"awsCloudMap": {"namespaceName": "example.com", "serviceName": "service-a"}}}'This command creates a virtual node named node-a that listens on port 8080 for HTTP traffic and uses AWS Cloud Map for service discovery.
Step 6: Deploy Envoy Proxy
Deploy the Envoy proxy alongside your microservices. The Envoy proxy will intercept all traffic to and from your microservices and enforce the traffic management policies defined in App Mesh.
The deployment process varies depending on your container orchestration platform. For example, if you are using Kubernetes, you can use a DaemonSet to deploy Envoy to all nodes in your cluster. [See also: Deploying Envoy Proxy on Kubernetes]
Step 7: Configure Your Application
Configure your application to use the virtual services defined in App Mesh. This typically involves updating your application’s configuration to use the virtual service names instead of the direct IP addresses of your microservices.
Step 8: Verify the Configuration
After deploying the Envoy proxy and configuring your application, verify that the traffic is being routed correctly. You can use the App Mesh dashboard or the AWS CLI to monitor the traffic flow and ensure that the traffic management policies are being enforced.
Advanced Features of AWS App Mesh
Once you have the basic setup of AWS App Mesh in place, you can explore some of the advanced features to further enhance your microservices architecture:
Traffic Shifting for Canary Deployments
Use traffic shifting to gradually roll out new versions of your microservices. You can start by routing a small percentage of traffic to the new version and gradually increase the percentage as you gain confidence in the new version. This is a powerful feature when you setup AWS App Mesh correctly.
Fault Injection for Resilience Testing
Use fault injection to test the resilience of your applications. You can inject faults such as delays or errors into the traffic flow to simulate real-world failures and ensure that your applications can handle these failures gracefully. Properly setting up AWS App Mesh enables this testing.
Mutual TLS for Secure Communication
Use mutual TLS (mTLS) to secure service-to-service communication. mTLS ensures that both the client and the server are authenticated before traffic is allowed to flow. This is a critical aspect of securing your microservices architecture. Correct configuration during the process of how to setup AWS App Mesh is crucial for implementing mTLS.
Integration with Monitoring Tools
Integrate App Mesh with your existing monitoring tools to gain detailed insights into your microservices. App Mesh provides metrics, logs, and traces that can be used to monitor the health and performance of your microservices. [See also: Integrating AWS App Mesh with Prometheus]
Troubleshooting Common Issues
While setting up AWS App Mesh, you might encounter some common issues. Here are a few tips to help you troubleshoot:
- Envoy Proxy Configuration: Ensure that the Envoy proxy is correctly configured and running alongside your microservices.
- Traffic Routing: Verify that the traffic is being routed correctly by checking the App Mesh dashboard or the AWS CLI.
- Service Discovery: Ensure that your microservices are correctly registered with your service discovery mechanism (e.g., AWS Cloud Map).
- Permissions: Verify that your AWS account has the necessary permissions to create and manage App Mesh resources.
Conclusion
Setting up AWS App Mesh can significantly improve the management and observability of your microservices architecture. By following this comprehensive guide, you can effectively configure App Mesh, implement traffic management policies, and secure your service-to-service communication. AWS App Mesh offers a robust solution for managing complex microservices deployments, providing the tools necessary for observability, traffic control, and security. Understanding how to setup AWS App Mesh is an invaluable skill for any modern cloud architect or developer. Remember to leverage the advanced features such as traffic shifting and fault injection to further optimize your microservices architecture. By mastering the steps outlined in this guide, you’ll be well-equipped to harness the power of AWS App Mesh for your applications. The benefits of using AWS App Mesh include improved resilience, better observability, and enhanced security for your microservices. With the right configuration, you can create a more robust and manageable microservices environment. This detailed guide should provide a solid foundation for understanding how to setup AWS App Mesh and how to make the most of its capabilities.

