How to Disassemble a Single Hole Faucet: A Comprehensive Guide
Single hole faucets, also known as single-handle faucets, are a common fixture in modern kitchens and bathrooms. Their sleek design and ease of use make them a popular choice for homeowners. However, like any plumbing fixture, they can sometimes require maintenance or repair. Knowing how to disassemble a single hole faucet is a valuable skill that can save you time and money on plumbing services. This comprehensive guide provides a step-by-step approach to safely and effectively taking apart your single hole faucet.
Why Disassemble a Single Hole Faucet?
There are several reasons why you might need to disassemble a single hole faucet. Common issues include:
- Leaks: Dripping faucets are a common problem. Disassembly allows you to identify and replace worn-out O-rings, cartridges, or other components causing the leak.
- Reduced Water Flow: Mineral buildup can restrict water flow. Taking the faucet apart allows you to clean or replace affected parts.
- Stiff Handle: A stiff or difficult-to-move handle often indicates a problem with the cartridge or other internal components. Disassembly allows for inspection and lubrication or replacement.
- Replacement: If you’re replacing the entire faucet, you’ll need to disassemble the old single hole faucet to remove it from the sink.
Tools You’ll Need
Before you begin, gather the necessary tools. Having everything on hand will make the process smoother and more efficient. Here’s a list of essential tools:
- Adjustable Wrench: For loosening and tightening nuts and connections.
- Basin Wrench (Faucet Wrench): Specifically designed for reaching tight spaces under the sink.
- Screwdrivers (Phillips and Flathead): For removing screws and prying off caps.
- Allen Wrench Set: Often needed to loosen set screws that hold handles in place.
- Pliers: For gripping and manipulating small parts.
- Penetrating Oil: To loosen stubborn nuts and bolts.
- White Vinegar: For soaking parts to remove mineral buildup.
- Clean Cloths or Rags: For wiping up spills and cleaning parts.
- Small Container: To hold small parts and prevent them from getting lost.
- Safety Glasses: To protect your eyes from debris.
- Work Gloves: To protect your hands.
Step-by-Step Guide to Disassembling a Single Hole Faucet
Follow these steps carefully to safely and effectively disassemble your single hole faucet:
Step 1: Turn Off the Water Supply
The most crucial step is to turn off the water supply to the faucet. Locate the shut-off valves under the sink (usually hot and cold). Turn both valves clockwise until they are completely closed. If you don’t have shut-off valves, you’ll need to turn off the main water supply to your house.
Step 2: Disconnect the Water Supply Lines
Place a bucket or container under the sink to catch any remaining water. Use an adjustable wrench to loosen the nuts connecting the water supply lines to the faucet tailpieces. Carefully disconnect the lines. Be prepared for a small amount of water to spill.
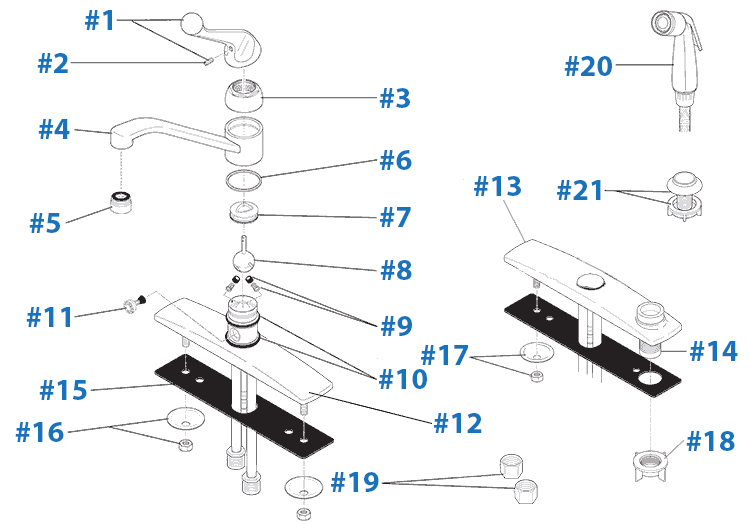
Step 3: Remove the Handle
The handle removal process varies depending on the faucet model. Look for a set screw, often located on the side or front of the handle. Use an Allen wrench to loosen the set screw. Once loosened, the handle should pull off. If there’s no set screw, look for a decorative cap on top of the handle. Pry off the cap with a flathead screwdriver to reveal a screw underneath. Remove the screw and then pull off the handle.
Step 4: Remove the Escutcheon Plate (If Applicable)
Some single hole faucets have an escutcheon plate that covers the hole in the sink. This plate may be held in place by screws or a retaining nut. Remove any screws or loosen the retaining nut to remove the escutcheon plate.
Step 5: Remove the Cartridge Retaining Clip or Nut
The cartridge is the valve that controls the water flow and temperature. It’s usually held in place by a retaining clip or nut. The clip is typically a small, U-shaped piece of metal. Use pliers to carefully remove the clip. If there’s a retaining nut, use an adjustable wrench to loosen and remove it.
Step 6: Remove the Cartridge
Once the retaining clip or nut is removed, you should be able to pull the cartridge straight up and out of the faucet body. It may be necessary to gently wiggle the cartridge to loosen it. Be careful not to damage the cartridge during removal.
Step 7: Inspect the Cartridge and Other Components
Now that you have the cartridge removed, inspect it for signs of wear and tear, such as cracks, breaks, or mineral buildup. Also, inspect the faucet body and other components for any damage or corrosion. This is a good time to clean any mineral deposits with white vinegar and a soft brush.
Step 8: Remove the Spout (If Necessary)
In some cases, you may need to remove the spout to access other components or to clean it thoroughly. The spout is typically held in place by an O-ring or a set screw. Look for a set screw on the base of the spout and loosen it with an Allen wrench. If there’s no set screw, the spout is likely held in place by an O-ring. Gently twist and pull the spout to remove it. Be careful not to damage the O-ring.
Step 9: Clean and Inspect All Parts
Thoroughly clean all the parts of the faucet with white vinegar and a soft brush. This will remove any mineral buildup and help to prolong the life of the faucet. Inspect all the O-rings and seals for signs of wear and tear. Replace any damaged or worn-out parts.
Troubleshooting Common Problems
While disassembling your single hole faucet, you might encounter a few common problems:
- Stuck Parts: If parts are stuck, apply penetrating oil and let it sit for a few minutes before attempting to loosen them.
- Stripped Screws: If you strip a screw head, try using a rubber band or steel wool between the screwdriver and the screw to get a better grip.
- Broken Parts: If you break a part during disassembly, you’ll need to replace it. Take the broken part to a hardware store to find a suitable replacement.
Reassembling the Faucet
Once you’ve cleaned, inspected, and replaced any necessary parts, it’s time to reassemble the faucet. Follow the disassembly steps in reverse order. Be sure to lubricate all O-rings and seals with silicone grease before reassembling. This will help to prevent leaks and make the faucet easier to operate. Ensure that the cartridge is properly aligned before securing it with the retaining clip or nut. Tighten all connections securely, but don’t overtighten them, as this can damage the parts. After reassembly, turn the water supply back on slowly and check for leaks. If you find any leaks, tighten the connections further or replace any damaged parts.
Safety Precautions
Always prioritize safety when working with plumbing fixtures. Wear safety glasses to protect your eyes from debris. Wear work gloves to protect your hands. Be careful when using tools, and avoid applying excessive force, as this can damage the faucet or cause injury. If you’re not comfortable disassembling the faucet yourself, it’s best to call a qualified plumber.
When to Call a Professional
While this guide provides a comprehensive overview of how to disassemble a single hole faucet, there are times when it’s best to call a professional plumber. If you’re not comfortable working with plumbing fixtures, if you encounter any difficult problems, or if you’re unsure about any of the steps, it’s always best to err on the side of caution and call a plumber. A plumber has the experience and expertise to diagnose and repair any plumbing problems quickly and efficiently.
Conclusion
Knowing how to disassemble a single hole faucet is a valuable skill that can save you time and money on plumbing repairs. By following the steps outlined in this guide, you can safely and effectively take apart your faucet, identify any problems, and make the necessary repairs. Remember to always prioritize safety and to call a professional plumber if you’re not comfortable doing the work yourself. With a little patience and the right tools, you can keep your single hole faucet functioning properly for years to come. Understanding how to disassemble a single hole faucet empowers you to maintain your home’s plumbing and address common issues proactively. This knowledge contributes to responsible homeownership and can prevent minor problems from escalating into costly repairs. Regularly checking and maintaining your faucet, including knowing how to disassemble a single hole faucet, ensures its longevity and efficient operation. This prevents water wastage and reduces the likelihood of unexpected plumbing emergencies. Being able to disassemble a single hole faucet is a practical skill that every homeowner should possess, allowing for timely maintenance and repairs. It not only saves money but also provides a sense of self-reliance in managing household upkeep.
[See also: How to Replace a Kitchen Faucet]
[See also: Troubleshooting a Leaky Faucet]
[See also: Understanding Different Types of Faucets]

