
DIY Delight: Crafting Your Own Patio Cooler Plans for the Perfect Outdoor Oasis
As the sun blazes and summer gatherings beckon, the quest for keeping beverages refreshingly cold becomes paramount. Instead of relying on bulky, store-bought coolers, why not embark on a rewarding DIY project? Crafting your own patio cooler plans not only provides a personalized touch to your outdoor space but also offers a cost-effective and satisfying solution for keeping drinks chilled. This guide delves into the world of patio cooler plans, exploring various designs, materials, and construction techniques to help you create the perfect cooler for your patio.
Why Choose DIY Patio Cooler Plans?
The appeal of DIY patio cooler plans extends beyond mere cost savings. A custom-built cooler allows you to tailor the size, style, and functionality to perfectly match your needs and aesthetic preferences. Imagine a cooler seamlessly integrated into your existing patio furniture, or a rustic wooden design that complements your garden décor. Furthermore, the satisfaction of building something with your own hands is an invaluable reward.
- Customization: Tailor the cooler to your exact specifications.
- Cost-Effectiveness: Often cheaper than purchasing a pre-made cooler.
- Personalization: Add unique design elements to reflect your style.
- Sustainability: Use reclaimed materials for an eco-friendly project.
- Skill Development: Enhance your woodworking and DIY skills.
Exploring Different Patio Cooler Plans
The realm of patio cooler plans is vast and diverse, offering options to suit every skill level and design preference. Here are some popular styles to consider:
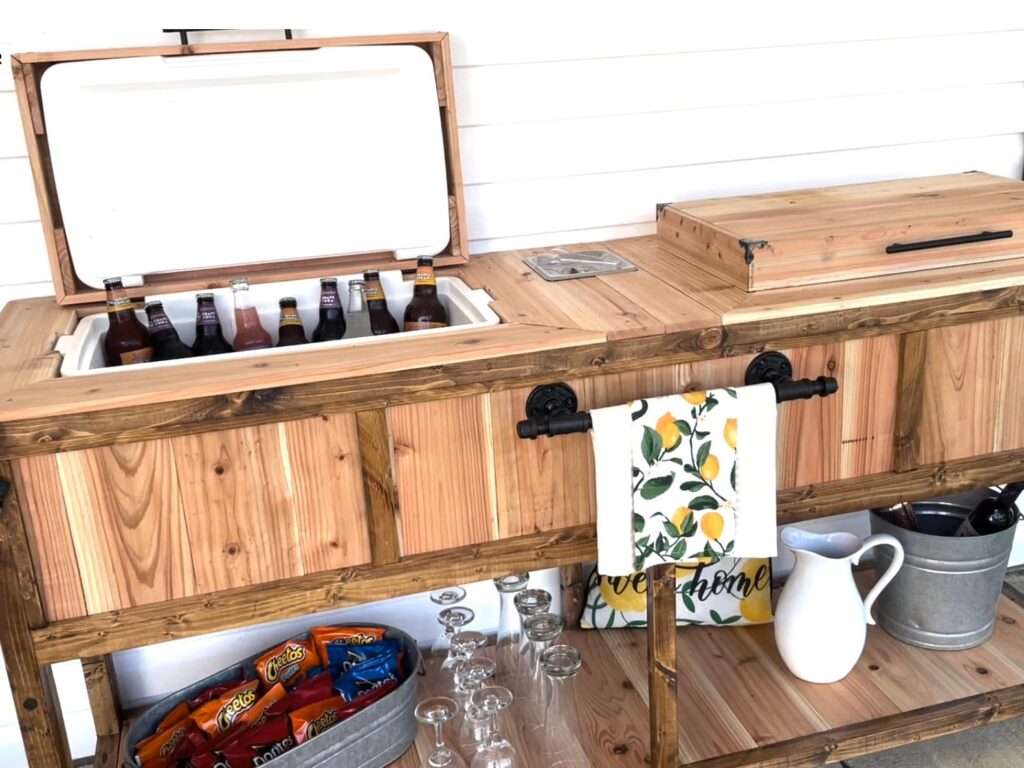
The Classic Wooden Cooler
This timeless design typically involves constructing a wooden box with insulated lining. The exterior can be stained, painted, or left natural to match your patio décor. Consider adding features like a bottle opener, towel rack, or even wheels for easy portability. Popular wood choices include cedar, redwood, and pressure-treated lumber for weather resistance. [See also: Building a Cedar Chest Cooler]
The Repurposed Barrel Cooler
For a rustic and charming aesthetic, consider repurposing a wooden barrel into a cooler. This project involves cleaning and sealing the barrel, adding insulation, and installing a drain. The barrel’s natural curvature provides a unique and eye-catching design. These patio cooler plans are great for a bar area.
The Pallet Cooler
An eco-friendly and budget-conscious option, pallet coolers are constructed from reclaimed wooden pallets. This project is relatively simple and requires minimal tools and materials. Pallet coolers offer a rustic and industrial look, perfect for casual outdoor gatherings. Ensure that you use heat-treated pallets that are safe for use in food and beverage applications. Look for the HT stamp on the pallet. These patio cooler plans are easy to adapt.
The Rolling Cooler Cart
Combine functionality and style with a rolling cooler cart. This design involves building a wooden frame with wheels, incorporating a cooler insert, and adding features like a countertop and storage shelves. Rolling cooler carts are ideal for entertaining and provide a convenient way to transport drinks and snacks around your patio. These patio cooler plans are great if you move around the patio a lot.
The Built-In Cooler
For a seamless and integrated look, consider building a cooler directly into your patio structure. This project involves constructing a frame within your patio bar or outdoor kitchen, lining it with insulation, and adding a drain. Built-in coolers offer a permanent and stylish solution for keeping drinks cold. Be sure to follow all relevant building codes and regulations. These patio cooler plans require more planning.
Materials and Tools for Your Patio Cooler Project
Before embarking on your patio cooler plans, gather the necessary materials and tools. Here’s a comprehensive list to get you started:
- Wood: Cedar, redwood, pressure-treated lumber, or reclaimed pallets.
- Insulation: Foam board, rigid insulation, or spray foam.
- Liner: Plastic tub, galvanized steel, or stainless steel.
- Hardware: Screws, nails, hinges, handles, and latches.
- Drain: Faucet or drain plug.
- Tools: Saw, drill, screwdriver, measuring tape, level, and sandpaper.
- Safety Gear: Safety glasses, gloves, and dust mask.
Step-by-Step Guide to Building a Simple Wooden Patio Cooler
Let’s walk through the process of building a basic wooden patio cooler. This project is suitable for beginners and requires minimal tools and materials.
- Design and Plan: Determine the desired size and dimensions of your cooler. Sketch out a plan and gather your materials.
- Cut the Wood: Cut the wood according to your plan. Ensure that all pieces are square and accurate.
- Assemble the Box: Assemble the wooden box using screws or nails. Reinforce the corners with corner braces for added stability.
- Insulate the Interior: Line the interior of the box with insulation. Cut the insulation to fit snugly and secure it with adhesive.
- Install the Liner: Place the liner inside the insulated box. Ensure that it fits snugly and is waterproof.
- Add a Drain: Install a drain at the bottom of the liner to allow for easy drainage.
- Finish the Exterior: Sand the exterior of the box and apply a stain, paint, or sealant to protect the wood.
- Add Hardware: Install hinges, handles, and latches to complete the cooler.
Tips for Success with Your Patio Cooler Plans
To ensure a successful and enjoyable DIY experience, consider these helpful tips:
- Start with a Simple Design: If you’re a beginner, choose a simple design that requires minimal tools and materials.
- Accurate Measurements are Key: Precise measurements are crucial for a well-constructed cooler. Double-check your measurements before cutting any materials.
- Use Quality Materials: Invest in quality materials that will withstand the elements and provide long-lasting performance.
- Proper Insulation is Essential: Adequate insulation is crucial for keeping drinks cold. Choose an insulation material with a high R-value.
- Ensure Proper Drainage: A functioning drain is essential for removing melted ice and preventing water damage.
- Protect the Wood: Apply a sealant or stain to protect the wood from moisture and UV damage.
- Prioritize Safety: Always wear safety glasses, gloves, and a dust mask when working with power tools.
Beyond the Basics: Advanced Patio Cooler Features
Once you’ve mastered the basics, consider adding advanced features to your patio cooler plans to enhance its functionality and style.
- Built-in Bottle Opener: A convenient addition for opening bottles with ease.
- Towel Rack: A practical feature for drying wet hands and towels.
- LED Lighting: Add ambiance with LED lighting inside the cooler.
- Bluetooth Speaker: Integrate a Bluetooth speaker for playing music.
- Charging Station: Include a USB charging station for powering devices.
Maintaining Your DIY Patio Cooler
Proper maintenance is essential for extending the life of your DIY patio cooler. Here are some tips to keep it in top condition:
- Clean Regularly: Clean the cooler regularly with soap and water to prevent mold and mildew growth.
- Dry Thoroughly: After each use, dry the cooler thoroughly to prevent water damage.
- Store Indoors: When not in use, store the cooler indoors to protect it from the elements.
- Inspect Regularly: Inspect the cooler regularly for signs of damage or wear and tear.
- Repair Promptly: Repair any damage promptly to prevent further deterioration.
Patio Cooler Plans: A Rewarding DIY Project
Crafting your own patio cooler plans is a rewarding DIY project that offers a personalized and cost-effective solution for keeping drinks chilled. With a little planning and effort, you can create a custom cooler that perfectly complements your outdoor space and enhances your entertaining experience. So, gather your tools, choose your design, and embark on this exciting DIY adventure. Enjoy the satisfaction of building something with your own hands and the pleasure of sipping refreshing drinks in your outdoor oasis. The perfect patio cooler plans are waiting for you to bring them to life.
From simple wooden boxes to repurposed barrels and rolling carts, the possibilities are endless. Embrace the challenge, unleash your creativity, and build a patio cooler that reflects your unique style and personality. Your next outdoor gathering will be cooler than ever. Choosing the right patio cooler plans is key. Once you have built one, you will want to build more patio cooler plans!
Consider the space available on your patio. This will help determine the size and style of patio cooler plans you will want to build. Also, factor in how many people you would normally have at your gatherings. This will influence how large of a cooler you will need. Remember to share your completed patio cooler plans with friends and family. They will be impressed with your DIY skills. Have fun planning your patio cooler plans!

