DIY Cinder Block Fence: A Comprehensive Guide to Building Your Own
Building a fence can significantly enhance your property’s privacy, security, and aesthetic appeal. While professional installation is always an option, embarking on a DIY cinder block fence project can save you money and provide a sense of accomplishment. This comprehensive guide will walk you through the entire process, from planning and preparation to construction and finishing touches, ensuring you create a durable and attractive cinder block fence that meets your needs.
Planning Your Cinder Block Fence
Assessing Your Needs and Property
Before you even think about buying materials, take some time to assess your needs and evaluate your property. Consider the following:
- Purpose: What do you want the fence to achieve? Is it for privacy, security, pet containment, or simply aesthetic enhancement?
- Height: How tall should the fence be? Local regulations often dictate maximum fence heights, so it’s crucial to check with your city or county planning department. Taller fences offer more privacy but can also block sunlight and views.
- Length: Measure the perimeter where you plan to build the fence. Accurate measurements are essential for calculating the amount of materials you’ll need.
- Soil Conditions: Understanding your soil type is crucial for foundation stability. Sandy soil drains well but offers less support, while clay soil retains moisture and can heave during freeze-thaw cycles. [See also: Understanding Soil Types for Construction Projects]
- Underground Utilities: Before digging, always contact your local utility companies to locate and mark any underground lines. Striking a gas or electrical line can be extremely dangerous and costly.
- Property Lines: Confirm your property boundaries to avoid encroaching on your neighbor’s land. A professional survey may be necessary if you’re unsure.
Choosing the Right Cinder Blocks
Cinder blocks, also known as concrete masonry units (CMUs), come in various sizes, shapes, and finishes. Here’s what to consider:
- Size: Standard cinder blocks are typically 8x8x16 inches. However, you can find smaller or larger blocks depending on your design.
- Shape: Besides standard rectangular blocks, you can find specialized blocks for corners, caps, and decorative purposes.
- Finish: Cinder blocks come in a variety of finishes, from smooth to textured. You can also paint, stain, or stucco them to achieve your desired look. A smooth finish is easier to paint, while a textured finish can add visual interest.
- Strength: Ensure the cinder blocks you choose are rated for outdoor use and can withstand the elements in your climate. Look for blocks with a high compressive strength rating.
Designing Your Cinder Block Fence
Your cinder block fence design should complement your home’s architecture and the surrounding landscape. Consider these design elements:
- Layout: Decide whether you want a straight fence, a curved fence, or a combination of both. Consider incorporating gates for access.
- Pattern: Experiment with different block patterns to create visual interest. You can stack the blocks in a traditional running bond pattern or try a more decorative pattern.
- Color: Choose a color that complements your home and landscaping. You can paint, stain, or stucco the blocks to achieve your desired color.
- Embellishments: Consider adding decorative elements such as caps, columns, or inserts to enhance the fence’s appearance. You could also incorporate plants or vines to soften the look of the cinder block fence.
Preparing for Construction
Gathering Tools and Materials
Having the right tools and materials on hand will make the construction process much smoother. Here’s a list of essentials:
- Cinder Blocks: Calculate the number of blocks you need based on your fence’s length and height. Add extra for cuts and breakage.
- Mortar: Choose a high-quality mortar mix specifically designed for masonry work.
- Gravel: Use gravel for the base of the foundation to improve drainage.
- Rebar: Rebar (reinforcing bar) adds strength and stability to the fence.
- Concrete: Use concrete for the foundation footing.
- Water: You’ll need water for mixing mortar and concrete.
- Mixing Tubs: Use these for mixing mortar and concrete.
- Shovels and Spades: For digging the foundation trench.
- Wheelbarrow: To transport materials.
- Mason’s Trowel: For applying mortar.
- Level: To ensure the fence is level and plumb.
- String Line and Stakes: To create a straight line for the fence.
- Safety Glasses and Gloves: To protect your eyes and hands.
- Measuring Tape: For accurate measurements.
- Circular Saw with Masonry Blade: For cutting cinder blocks.
- Tamper: For compacting the soil and gravel.
Preparing the Site
Proper site preparation is crucial for a stable and long-lasting cinder block fence. Follow these steps:
- Clear the Area: Remove any vegetation, rocks, or debris from the fence line.
- Excavate the Foundation Trench: Dig a trench along the fence line. The depth of the trench will depend on your local frost line and soil conditions. A general rule of thumb is to dig at least 12 inches deep.
- Compact the Soil: Use a tamper to compact the soil at the bottom of the trench.
- Add Gravel: Pour a layer of gravel into the trench to improve drainage. Compact the gravel with a tamper.
Constructing Your Cinder Block Fence
Pouring the Foundation
The foundation provides a stable base for your cinder block fence. Follow these steps:
- Mix the Concrete: Mix the concrete according to the manufacturer’s instructions.
- Pour the Concrete: Pour the concrete into the trench, filling it to the desired level.
- Insert Rebar: Insert vertical rebar into the wet concrete at regular intervals. These rebar pieces will extend up into the hollow cores of the cinder blocks, providing added strength. Space the rebar according to your local building codes.
- Level the Concrete: Use a level to ensure the concrete surface is level.
- Cure the Concrete: Allow the concrete to cure for at least 48 hours before proceeding. Keep the concrete moist during the curing process to prevent cracking.
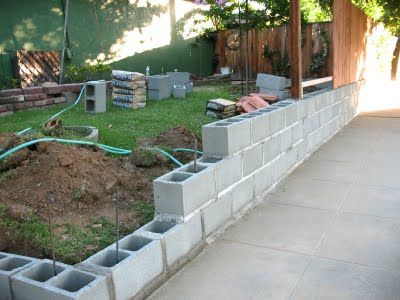
Laying the Cinder Blocks
Laying the cinder blocks is the most time-consuming part of the project. Follow these steps carefully:
- Mix the Mortar: Mix the mortar according to the manufacturer’s instructions. The mortar should have a consistency similar to peanut butter.
- Apply Mortar to the Foundation: Apply a layer of mortar to the top of the concrete foundation.
- Lay the First Course of Blocks: Carefully place the first course of cinder blocks onto the mortar bed. Use a level to ensure the blocks are level and plumb. Maintain consistent mortar joints between the blocks.
- Apply Mortar to the Blocks: Apply mortar to the top and sides of each block before placing the next block.
- Continue Laying Blocks: Continue laying blocks, course by course, until you reach the desired height. Be sure to stagger the joints between courses for added strength.
- Insert Vertical Rebar: As you lay the blocks, insert vertical rebar into the hollow cores of the blocks. Fill the cores with concrete to secure the rebar.
- Clean Excess Mortar: Use a trowel to remove any excess mortar from the joints.
Finishing Touches
Once the mortar has cured, you can add finishing touches to your cinder block fence:
- Apply a Sealant: Applying a sealant will protect the blocks from moisture and staining.
- Paint or Stain the Fence: Painting or staining the fence will enhance its appearance and protect it from the elements.
- Add Caps: Adding caps to the top of the fence will give it a finished look and prevent water from entering the hollow cores of the blocks.
- Install Lighting: Consider adding lighting to the fence for added security and ambiance. [See also: Outdoor Lighting Ideas for Fences]
- Landscaping: Plant flowers or shrubs along the base of the fence to soften its appearance.
Safety Precautions
Working with cinder blocks and mortar can be hazardous. Always wear safety glasses and gloves to protect your eyes and hands. When cutting cinder blocks, wear a dust mask to avoid inhaling concrete dust. Be careful when lifting heavy blocks to avoid back injuries. If you’re not comfortable working with power tools or heavy materials, consider hiring a professional contractor.
Maintaining Your Cinder Block Fence
A well-built cinder block fence can last for many years with proper maintenance. Inspect the fence regularly for cracks or damage. Repair any cracks promptly to prevent further deterioration. Clean the fence periodically with a pressure washer to remove dirt and grime. Reapply sealant every few years to protect the blocks from moisture.
Conclusion
Building a cinder block fence is a challenging but rewarding DIY project. By following these steps and taking the necessary precautions, you can create a durable and attractive fence that will enhance your property for years to come. Remember to plan carefully, gather the right tools and materials, and take your time. With a little effort, you can build a cinder block fence that you’ll be proud of.

