Mastering Landscape in Google Docs: A Comprehensive Guide
Google Docs, a ubiquitous tool for document creation and collaboration, offers a range of features to tailor your documents to specific needs. One such feature is the ability to change the page orientation to landscape. This can be particularly useful for documents with wide tables, charts, or images that benefit from the extra horizontal space. This comprehensive guide will walk you through the process of setting up landscape Google Docs, troubleshooting common issues, and exploring advanced formatting options.
Why Use Landscape Orientation in Google Docs?
Before diving into the how-to, let’s understand why you might want to use landscape Google Docs in the first place. The default portrait orientation is often suitable for standard text-based documents. However, landscape orientation, where the page is wider than it is tall, offers several advantages:
- Improved Visual Presentation: Landscape is ideal for displaying wide content, such as spreadsheets, infographics, or complex diagrams.
- Enhanced Readability: For documents with dense tables or charts, landscape can improve readability by providing more space for each element.
- Creative Design Options: Landscape opens up creative possibilities for designing posters, brochures, or other visually appealing documents.
How to Change to Landscape in Google Docs: A Step-by-Step Guide
Changing the page orientation to landscape in Google Docs is a straightforward process, but the exact steps depend on whether you want to apply it to the entire document or just a specific section.
Applying Landscape to the Entire Document
This is the simplest method and applies the landscape Google Docs orientation to every page in your document. Here’s how:
- Open Your Document: Open the Google Docs document you want to modify.
- Navigate to File: Click on the ‘File’ menu at the top left of the screen.
- Select Page Setup: In the ‘File’ menu, choose ‘Page setup’.
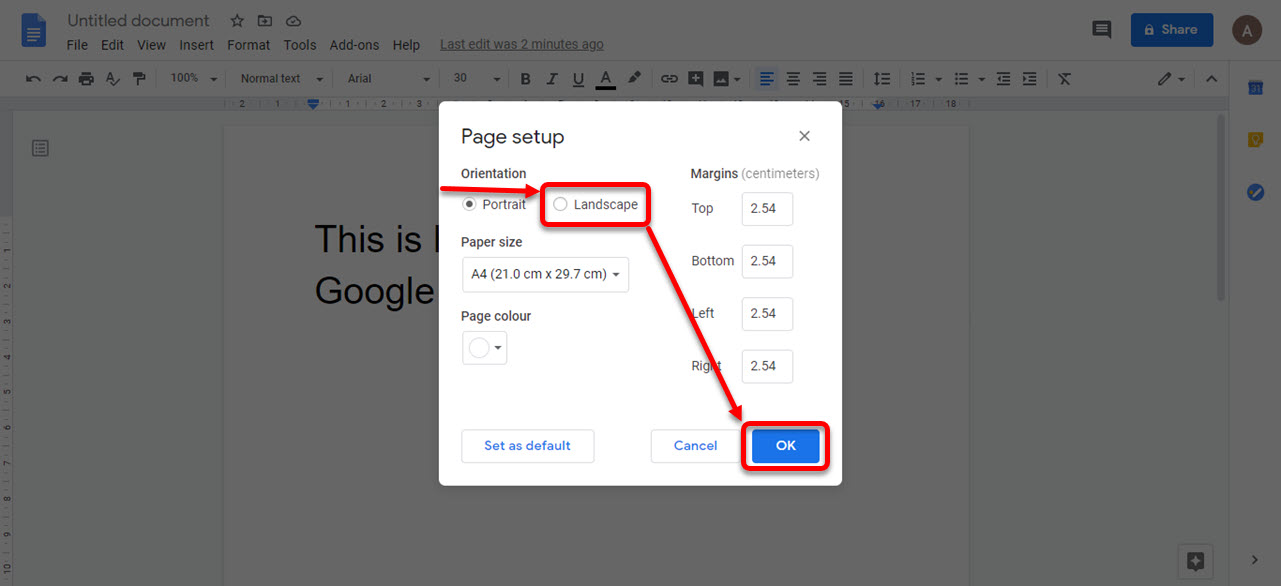
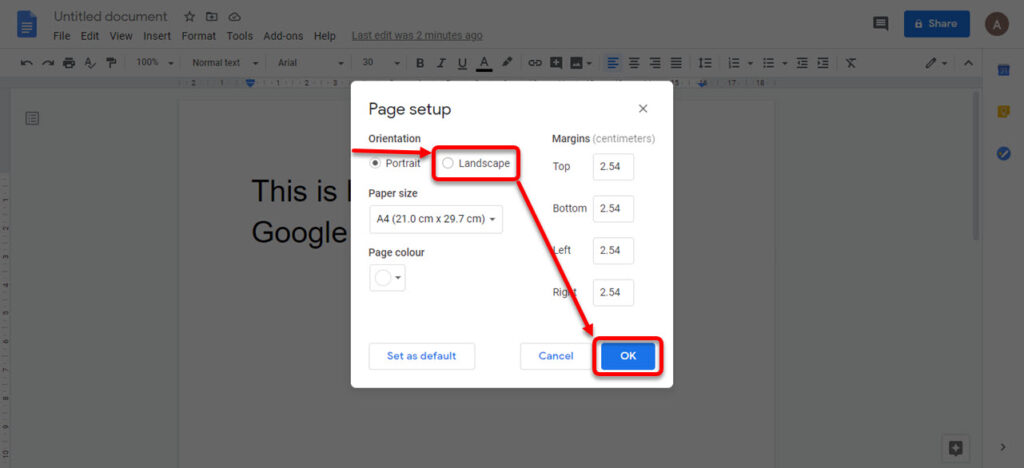
- Choose Orientation: In the ‘Page setup’ dialog box, find the ‘Orientation’ section. Select ‘Landscape’.
- Apply Changes: Click ‘OK’ to apply the changes. Your entire document will now be in landscape orientation.
Applying Landscape to a Specific Section
Sometimes, you might only want a specific page or section of your document to be in landscape while the rest remains in portrait. This requires a slightly more involved process using section breaks. Here’s how to achieve this:
- Insert Section Breaks: Place your cursor at the beginning and end of the section you want to change to landscape. Go to ‘Insert’ > ‘Break’ > ‘Section break (next page)’. This will create two section breaks, isolating the desired section.
- Select the Section: Click anywhere within the section you want to format in landscape.
- Open Page Setup: Go to ‘File’ > ‘Page setup’.
- Choose Orientation: Select ‘Landscape’ in the ‘Orientation’ section.
- Apply to This Section: Before clicking ‘OK’, make sure the ‘Apply to’ dropdown is set to ‘This section’. This is crucial for only changing the selected section.
- Confirm Changes: Click ‘OK’. Only the section between the section breaks will now be in landscape Google Docs orientation.
Troubleshooting Common Issues with Landscape in Google Docs
While the process is generally straightforward, you might encounter some issues when working with landscape Google Docs. Here are some common problems and their solutions:
Incorrect Section Application
Problem: You applied landscape orientation, but it affected the entire document instead of just the intended section.
Solution: Double-check that you correctly inserted section breaks before and after the section you want to modify. Also, ensure that the ‘Apply to’ dropdown in the ‘Page setup’ dialog box is set to ‘This section’ before clicking ‘OK’.
Formatting Issues
Problem: Text, tables, or images are not properly aligned or formatted in landscape mode.
Solution: Adjust the margins, column widths, and other formatting settings to better suit the landscape orientation. You might need to resize elements or adjust text wrapping to achieve the desired appearance. Experiment with different layouts and spacing to optimize the visual appeal of your landscape Google Docs section. [See also: Google Docs Formatting Tips and Tricks]
Section Breaks Not Working
Problem: Section breaks are not properly isolating the section for landscape orientation.
Solution: Make sure you’re using ‘Section break (next page)’ instead of ‘Page break’. ‘Page break’ simply moves content to the next page without creating a separate section. You can also try deleting the section breaks and re-inserting them to ensure they are correctly placed. To visualize section breaks, go to ‘View’ > ‘Show section breaks’.
Advanced Formatting Options for Landscape Google Docs
Once you’ve mastered the basics of changing to landscape orientation, you can explore advanced formatting options to further customize your documents:
Custom Margins
Adjusting the margins in landscape Google Docs can significantly impact the layout and readability of your content. Wider margins can create more white space, making the document less cluttered and easier to read. To adjust margins, go to ‘File’ > ‘Page setup’ and modify the ‘Margins’ settings. Experiment with different margin sizes to find what works best for your specific content.
Column Layouts
For documents with a lot of text, using a multi-column layout in landscape mode can improve readability and visual appeal. To create columns, go to ‘Format’ > ‘Columns’ and choose the desired number of columns. Adjust the column width and spacing to optimize the layout for your content.
Headers and Footers
Headers and footers are essential for adding page numbers, titles, and other important information to your documents. In landscape Google Docs, you can customize the headers and footers to fit the wider page format. To add or edit headers and footers, go to ‘Insert’ > ‘Headers & footers’. You can then add text, images, or other elements to the header and footer areas.
Tables and Charts
Landscape orientation is particularly useful for displaying large tables and charts. When inserting tables or charts into landscape Google Docs, make sure to adjust their size and formatting to fit the page properly. You can also use features like table borders, shading, and text alignment to enhance their visual appeal. [See also: Creating Effective Tables in Google Docs]
Best Practices for Using Landscape in Google Docs
To ensure your landscape Google Docs documents are professional and effective, consider these best practices:
- Plan Your Layout: Before you start writing, plan the layout of your document and determine where landscape orientation would be most beneficial.
- Use Section Breaks Wisely: Only use section breaks when necessary to avoid unnecessary complexity.
- Optimize for Readability: Pay attention to font size, spacing, and margins to ensure your document is easy to read.
- Test on Different Devices: Preview your document on different devices (e.g., computers, tablets, smartphones) to ensure it looks good on all screens.
- Keep it Consistent: Maintain a consistent design and formatting throughout your document to create a professional and cohesive look.
Examples of When to Use Landscape in Google Docs
Here are some practical examples of when using landscape Google Docs can be particularly advantageous:
- Spreadsheets: Displaying large spreadsheets with numerous columns and rows.
- Infographics: Creating visually appealing infographics with charts, graphs, and images.
- Presentations: Designing presentation slides with wide content.
- Brochures: Creating brochures with multiple panels and images.
- Posters: Designing posters for events or announcements.
- Flowcharts: Displaying complex flowcharts and diagrams.
- Timelines: Creating timelines with detailed information across a wide span.
Conclusion
Mastering the use of landscape Google Docs can significantly enhance your document creation capabilities. By understanding the benefits of landscape orientation, following the step-by-step instructions for applying it to entire documents or specific sections, and troubleshooting common issues, you can create professional and visually appealing documents that effectively convey your message. Remember to explore the advanced formatting options and follow the best practices outlined in this guide to maximize the impact of your landscape Google Docs creations. With a little practice, you’ll be able to seamlessly integrate landscape orientation into your workflow and create documents that stand out.

