
DIY Paver Patio: A Comprehensive Guide to Building Your Own Outdoor Oasis
Creating a beautiful and functional outdoor space doesn’t always require hiring a professional. A DIY paver patio can be a rewarding project, adding value and enjoyment to your home. This comprehensive guide will walk you through each step of the process, from planning and preparation to installation and maintenance, ensuring you achieve a stunning and durable result. Whether you’re a seasoned DIY enthusiast or a beginner, this guide provides the knowledge and confidence to tackle your own DIY paver patio project.
Planning Your DIY Paver Patio
Before you even think about laying pavers, meticulous planning is crucial. This stage sets the foundation for a successful project.
Assessing Your Space
Begin by evaluating your yard. Consider the following:
- Size and Shape: Measure the area where you want to build your DIY paver patio. Determine the ideal shape – rectangular, square, circular, or a more custom design. Mark the boundaries clearly using stakes and string.
- Slope and Drainage: Observe how water flows in your yard during rain. Ensure the patio has a slight slope (about 1/4 inch per foot) away from your house to prevent water from pooling. Poor drainage can lead to paver shifting and damage over time. Consider installing a drainage system if necessary.
- Underground Utilities: Before digging, contact your local utility companies to locate and mark any underground lines (gas, water, electricity). This is a crucial safety step.
- Sunlight and Shade: Consider the amount of sunlight and shade the area receives. This will influence your choice of pavers and plants (if you plan to incorporate landscaping).
Choosing Your Pavers
Pavers come in a variety of materials, shapes, sizes, and colors. Consider these factors when making your selection:
- Material: Common paver materials include concrete, brick, and natural stone. Concrete pavers are generally the most affordable and versatile. Brick pavers offer a classic, timeless look. Natural stone pavers provide a unique, rustic aesthetic.
- Shape and Size: Paver shapes range from rectangular and square to hexagonal and interlocking designs. The size of the pavers will affect the installation time and overall appearance. Larger pavers cover more area quickly but can be heavier to handle.
- Color and Style: Choose a color and style that complements your home’s exterior and your personal taste. Consider the long-term aesthetic and how the pavers will look over time.
- Thickness: For patios, pavers should be at least 2 3/8 inches thick to withstand foot traffic and furniture weight.
Creating a Design
Sketch out your DIY paver patio design on paper or use online design tools. This will help you visualize the finished product and calculate the amount of materials you’ll need. Consider these design elements:
- Paver Pattern: Explore different paver patterns, such as herringbone, running bond, basket weave, or a custom design. The pattern will affect the look and feel of your patio.
- Border: Consider adding a border of contrasting pavers to define the edge of your patio and add visual interest.
- Features: Incorporate features like fire pits, seating walls, or planters into your design.
Estimating Materials
Accurately estimating materials is essential to avoid running out mid-project or overspending. Here’s a general guide:
- Pavers: Calculate the square footage of your patio and add 5-10% for cuts and waste.
- Base Material: You’ll need a base of compacted gravel or crushed stone. The depth of the base should be at least 4-6 inches, depending on soil conditions. Use a gravel calculator to determine the amount needed.
- Sand: A 1-inch layer of leveling sand will be used to set the pavers. Calculate the amount needed based on the square footage of your patio.
- Edging: Purchase enough edging material (plastic, metal, or concrete) to surround the perimeter of your patio.
- Joint Sand: Polymeric sand is recommended for filling the joints between pavers. It helps prevent weeds and stabilizes the pavers.
Preparing the Site for Your DIY Paver Patio
Proper site preparation is critical for a stable and long-lasting DIY paver patio.
Excavation
Begin by excavating the area to the required depth. This will depend on the thickness of your pavers, the depth of your base material, and the 1-inch layer of leveling sand. Generally, you’ll need to excavate 6-8 inches.
- Remove Topsoil: Remove any topsoil, grass, and vegetation from the area.
- Level the Ground: Ensure the ground is level and compact the soil using a plate compactor.
- Check for Proper Slope: Maintain the slight slope (1/4 inch per foot) away from your house for drainage.
Installing the Base Material
The base material provides a stable foundation for your pavers. It’s essential to compact it thoroughly.
- Spread the Base Material: Spread the gravel or crushed stone evenly over the excavated area.
- Compact the Base: Use a plate compactor to compact the base material in layers of 2-3 inches. This will ensure a solid foundation.
- Check for Level: Use a level to ensure the base is even and has the proper slope.
Installing Edging
Edging helps contain the pavers and prevents them from shifting over time.
- Position the Edging: Place the edging around the perimeter of your patio, following your design.
- Secure the Edging: Secure the edging with stakes or spikes, following the manufacturer’s instructions.
Laying the Pavers for Your DIY Paver Patio
Now comes the exciting part: laying the pavers!
Spreading the Leveling Sand
The leveling sand provides a smooth and even surface for setting the pavers.
- Spread the Sand: Spread a 1-inch layer of leveling sand over the compacted base material.
- Screed the Sand: Use a screed board (a straight piece of lumber) to level the sand. Drag the screed board across the sand, using the edging as a guide.
- Avoid Walking on the Sand: Avoid walking on the leveled sand to prevent disturbing the surface.
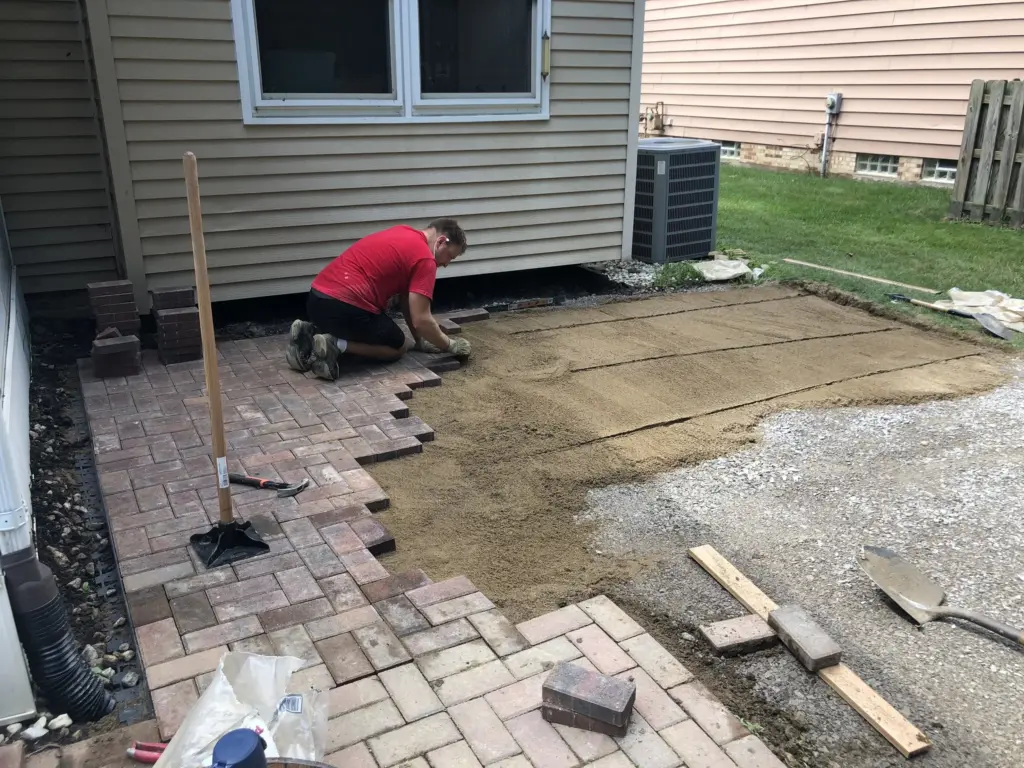
Setting the Pavers
Carefully set the pavers according to your chosen pattern.
- Start at One Corner: Begin laying pavers at one corner of the patio and work your way across.
- Maintain Consistent Spacing: Use paver spacers to maintain consistent spacing between the pavers.
- Check for Level: Use a level to ensure each paver is level. Tap the pavers gently with a rubber mallet to adjust their height.
- Cut Pavers as Needed: Use a paver cutter or a circular saw with a diamond blade to cut pavers to fit around edges and corners.
Compacting the Pavers
After laying all the pavers, compact them to ensure they are firmly set.
- Use a Plate Compactor: Use a plate compactor with a rubber pad to compact the pavers. The rubber pad will protect the pavers from damage.
- Compact in Multiple Passes: Compact the pavers in multiple passes, overlapping each pass slightly.
Finishing Your DIY Paver Patio
The final steps will complete your DIY paver patio and ensure its longevity.
Filling the Joints
Filling the joints between the pavers with polymeric sand helps stabilize the pavers and prevent weeds.
- Sweep in the Sand: Sweep polymeric sand into the joints between the pavers.
- Compact the Sand: Use a broom or brush to compact the sand into the joints.
- Water the Sand: Lightly water the sand, following the manufacturer’s instructions. The water will activate the polymers in the sand, causing it to harden and stabilize the pavers.
Sealing the Pavers (Optional)
Sealing the pavers can help protect them from staining and fading.
- Clean the Pavers: Clean the pavers thoroughly before applying sealant.
- Apply Sealer: Apply a paver sealant according to the manufacturer’s instructions.
Maintaining Your DIY Paver Patio
Regular maintenance will keep your DIY paver patio looking its best for years to come.
- Sweep Regularly: Sweep the patio regularly to remove dirt and debris.
- Wash Periodically: Wash the patio periodically with a garden hose or pressure washer.
- Remove Weeds: Remove weeds that grow in the joints between the pavers.
- Reapply Joint Sand: Reapply polymeric sand as needed to maintain the stability of the pavers.
- Reseal as Needed: Reseal the pavers every few years to protect them from staining and fading.
Conclusion
Building a DIY paver patio is a challenging but rewarding project. With careful planning, proper preparation, and attention to detail, you can create a beautiful and functional outdoor space that you’ll enjoy for years to come. Remember to prioritize safety, follow local building codes, and take your time. Your new DIY paver patio will not only enhance your property but also provide a perfect spot for relaxation and entertainment. Don’t be afraid to get your hands dirty and transform your backyard into an outdoor oasis! [See also: How to Choose the Right Pavers for Your Patio] [See also: Common Paver Patio Mistakes and How to Avoid Them]

